Homemade Cinnamon Rolls
Cinnamon Roll Dough
Instructions
1. Whisk the butter, sugars, and eggs all together in one bowl, until the batter is smooth without any lumps.
Sour Cream Banana Bread (save for later)
Cinnamon Roll Dough
- 2-½ teaspoons instant yeast
- ½ cup granulated sugar
- ¼ cup butter, melted
- 2 large eggs, at room temperature
- 1 teaspoon salt
- 4 cups all-purpose flour
- 1 cup warm milk (not hot)
Filling - ¾ cup light brown sugar, packed
- 2 tablespoons cinnamon
- ½ cup butter, softened
Icing - 6 ounces cream cheese, softened
- 1-½ cups powdered sugar
- ⅓ cup butter, melted
- 1 teaspoon vanilla extract
Making the Dough
1. Place warm milk in a mixing bowl, add yeast, and stir it. Let it sit for a minute or two while you gather your other ingredients.
2. Next, add sugar, eggs, butter, salt, and vanilla, and mix well. Lastly, using a dough hook, add flour and mix until it forms a firm yet tacky dough that pulls away from the edges. Resist adding more flour, the dough should be slightly tacky.
3. Remove dough from the mixer and knead by hand, on a lightly floured surface, for 5 minutes (yes, even if you used a stand mixer).
First Rising
1. Grease a large bowl with butter or cooking spray. Place the dough in this bowl, cover with a warm towel, and let sit in a warm spot for 1 to 1-½ hours or until it doubles in size.
Cinnamon Roll Filling
1. In a bowl, mix brown sugar, cinnamon, and softened butter together until it resembles a paste.
Rolling out the dough, adding filling, and cutting into shape
1. For this step, we used silicone baking mats, but you can also roll out the dough on a lightly floured surface. With a lightly floured rolling pin, roll out the dough into a rectangle, measuring approximately 22”x 14
2. Drop some of the cinnamon roll filling here and there over the rolled-out dough. Then, using a rubber spatula, gently spread the filling all over the dough, keeping away from the edges by about a quarter inch.
3. Starting at a short end (one of the 14” ends), gently but tightly roll the dough into one long roll.
4. Using a sharp knife (we found that a serrated knife worked best), cut the roll into 12 evenly sliced pieces.
Second Rising
1. Preheat oven to 350°F.
2. Place the cut cinnamon rolls into a parchment-lined baking dish, three rows of four.
3. Cover the dish with plastic wrap and let the rolls rise for another 30 minutes, or until they’ve nearly doubled in size.
Baking Cinnamon Rolls
1. Remove the plastic wrap and place baking pan in the oven on the middle rack. Bake for 20-30 minutes. Start checking on the rolls after 20 minutes. All ovens are different. The cinnamon rolls will be done when the tops have just lightly browned and the dough sounds hollow when you lightly tap on it with a spoon. The rolls will rise even more when they’re baking and will most likely touch each other. This is fine, they’ll stay soft in the middle.
Icing for Cinnamon Rolls
1. While the rolls are baking, make the icing. Using either a stand mixer or handheld mixer, blend cream cheese, powdered sugar, butter, and vanilla together until smooth.
2. When the cinnamon rolls are done baking, let them cool for about 5 minutes and add icing to the tops, so it will slightly melt and ooze between the swirls. If you prefer the icing thicker on top, wait until they’ve fully cooled.
Brown butter cookies (unfinished) - ¾ of a cup of butter on stove
- 1 cup of brown sugar
- ¼ cup of regular sugar
- 1 large egg yolk
- 1 whole egg
- Tablespoon vanilla
- 1 ¾ cup of flour
- ¾ teaspoon baking soda
Instructions
1. Whisk the butter, sugars, and eggs all together in one bowl, until the batter is smooth without any lumps.
Sour Cream Banana Bread (save for later)

National Dishes and How to Make Them
Czech RepublicSvíčková (swuh-VEECH-koh-vah)
Dec. 12, 2023,
By Bear Boeke Trevathan
Svíčková, a specific type of sauce, is described by Lance LaSalle on Quora as “...tastes absolutely delicious. Oh, my God is it good. It's a tangy, slightly sweet, very savory sauce made from vegetables and cream covering sirloin beef and served with dumplings and garnished with a bit of whipped cream and cranberry sauce. It's excellent, rich and hearty and super filling. Perfect autumn/winter food.” Now that you’ve heard from an expert, you might be wondering how to make this wonderful ride, well then, that’s a good thing because you’ll be finding out right now.
Ingredients
2 lbs beef sirloin
1 large onion, chopped
3 cloves garlic, minced
8 oz mushrooms, sliced
2 cups beef broth
1 cup heavy cream
1 cup sour cream
2 tablespoons vegetable oil
1 tablespoon butter
1 tablespoon flour
2 tablespoons Dijon mustard
2 tablespoons lemon juice
1 teaspoon marjoram
Salt and pepper to taste
For the Dumplings:
2 cups all-purpose flour
1 teaspoon baking powder
1 cup milk
2 eggs
1 teaspoon salt
1 tablespoon butter, melted
Instructions
Preheat your oven to 350°F (175°C).
Season the beef with salt and pepper. In a large pan, heat the vegetable oil over medium-high heat. Sear the beef on all sides until browned. Remove from the pan and set aside.
In the same pan, melt the butter and sauté the onion and garlic until fragrant. Add the mushrooms and cook until they release their moisture.
Sprinkle the flour over the mushrooms and onion mixture, stirring well to coat. Cook for a minute until the flour is incorporated.
Slowly pour in the beef broth while stirring continuously. Add the Dijon mustard, marjoram, lemon juice, salt, and pepper. Bring to a simmer.
Return the beef to the pan, cover, and transfer to the preheated oven. Cook for about 2 hours or until the beef is fork-tender.
While the beef is cooking, prepare the dumplings. In a bowl, whisk together the flour, baking powder, and salt. In a separate bowl, beat the eggs, milk, and melted butter. Gradually add the dry ingredients to the wet ingredients, stirring until combined.
Fill a large pot with salted water and bring it to a boil. Reduce the heat to a gentle simmer.
Drop spoonfuls of the dumpling batter into the simmering water. Cook for about 10 minutes until the dumplings float to the surface. Remove from the water and set aside.
Transfer the beef to a serving platter. Stir the heavy cream and sour cream into the sauce, bringing it back to a slight simmer.
Thinly slice the beef and pour the creamy mushroom sauce over it. Serve the svíčková alongside the dumplings, allowing everyone to indulge in this Czech delight.

Smarties®
By Eloise Mcdonald 12/13/22
Founded in 1949 by Edward Dee, Smarties® are a great candy. “They are the right portion size, like the size of the actual tablet is good, they are assorted colors, and they never spoil!” says Mr. O’Dell, eighth grade language arts teacher and the school newspaper teacher. Although some people do not like the smart sweets, whether you like them or not, Smarties are good for on the go and have a variety of colors, making them great.
Although it may not seem like it, Smarties is a family business. The original founder, Edward Dee, passed away on November 18, 2019. Despite this fact, Smarties remains a family run business now run by Edward’s granddaughters, Sarah, Jessica, and Liz. How did Dee start Smarties, you may wonder? Well, in 1949, Edward and his family moved from England to New Jersey. He then proceeded to found Ce De Candy, Inc, with only two machines. Later that year, Dee was able to open his first factory in Bloomfield, New Jersey. Ce De Candy went from a brand new business to having its own factory in months, showing Edward Dee’s perseverance and the success of the sweet, smart candy we call Smarties. On New Years of 2011 Ce De Candy Inc officially changed its name to Smarties Candy Company.
One reason why Smarties are great is because they have a variety of colors. This gives them a more appealing look and makes them ever so better. However, the actual color is not nearly enough to prove this. While some people say all Smarties taste the same, they actually don’t at all. The original Smarties come in 6 flavors with assigned colors: White tastes sugary with a bit of tang and is orange-cream flavored, a more muted version of the orange candy, yellow is pineapple flavored and has a distinct taste that is hard to describe, and pink is cherry although some could say it tastes differently, green actually tastes rather sweet and is strawberry flavored, purple is grape flavored and last but not least orange is orangey and great. Some can argue that the sugary rolls of smarties don’t have the flavors that were just described. However, Smarties without a doubt do not all taste the same. This is a big part of the greatness of Smarties because although it may not matter when you are popping them into your mouth, those who have tried Smarties can sympathize with the fact that they are just not the same without the different flavors and colors.
Another reason Smarties are a great candy is the fact that they are great for on the go. Candies like lollipops and Snickers, once they are open, you can’t just put them down. However, the lovely portions of Smarties and the smart wrapping make it so that you can eat a few sugar bites, then stuff the Smarties pack in your pocket for later. Even other bite-sized candies like Skittles and M&Ms can’t compete with this fact. With Skittles, for example, if you open it, pop a few candies in your mouth, then stuff the pack in your pocket, they could spill and you then just have a bunch of sticky skittles in your pocket, as I learned from personal experience. Also, even if you just set the bag of Skittles down the packaging will never be closed again. With Smarties, you can twist the wrapping back and forth even after the pack of Smarties is open sealing it again

Gluten-Free Quiche With Potato Crust Recipe
By Alanya Friedman
Ahhh, nothing better than a good ol’ Quiche on a cold winter day. And even better, it’s gluten-free! Despite the fact that it’s gluten-free, it still has that same warm, creamy texture, and crunchy outer crust. But in the middle of a pandemic, it can be hard to go out to a restaurant and order this. But now, with this simple recipe, you can become your own chef and make this meal yourself! And all you will need are these ingredients:
CRUST:
DIRECTIONS:
7. In a medium bowl, whisk together the eggs, half-and-half and nutmeg; season mixture with salt and pepper. Then, pour the custard over the greens in the crust. Sprinkle the cheese that is left over the surface.
8. Place the pan back into the oven and bake for 30 to 35 minutes, until the custard has set around the edge. Serve immediately, or store in the fridge wrapped in plastic wrap (can be left for up to two days.)
By Alanya Friedman
Ahhh, nothing better than a good ol’ Quiche on a cold winter day. And even better, it’s gluten-free! Despite the fact that it’s gluten-free, it still has that same warm, creamy texture, and crunchy outer crust. But in the middle of a pandemic, it can be hard to go out to a restaurant and order this. But now, with this simple recipe, you can become your own chef and make this meal yourself! And all you will need are these ingredients:
CRUST:
- Nonstick spray
- 2 large sweet potatoes, peeled and sliced into ¼-inch-thick rounds
- 1 tablespoon extra-virgin olive oil
- Nonstick spray
- 2 tablespoons extra-virgin olive oil
- 2 leeks, halved and thinly sliced
- 1 large bunch kale, remove the ribs from the kale.
- Kosher salt and freshly ground black pepper
- 1 cup grated Emmentaler or Gruyère cheese, divided
- 5 large eggs
- ¾ cup half-and-half or heavy cream
- ¼ teaspoon ground nutmeg
DIRECTIONS:
- Preheat your oven to 375°F. And grease a 9-inch springform pan with nonstick spray.
- MAKING THE CRUST: In a medium sized bowl, add the sweet potato rounds and olive oil acting as a coat. Cut a few of the larger sweet potato pieces in half and place them around the side of the springform pan facing upwards.
- Take the remaining sweet potatoes and order them (in an even layer) at the bottom of the pan. Then grease a sheet of aluminum foil, and use it to cast the inside of the slices and fill them with weights or dried beans.
- Bake the crust for 18 to 20 minutes.
- MAKING HE FILLING: As the crust cooks, heat up the olive oil in a large skillet over medium heat. Add leeks and sauté until tender, about 4 minutes. Add the kale in handfuls and sauté until wilted, about 5 minutes. Season the mixture with salt and pepper.
7. In a medium bowl, whisk together the eggs, half-and-half and nutmeg; season mixture with salt and pepper. Then, pour the custard over the greens in the crust. Sprinkle the cheese that is left over the surface.
8. Place the pan back into the oven and bake for 30 to 35 minutes, until the custard has set around the edge. Serve immediately, or store in the fridge wrapped in plastic wrap (can be left for up to two days.)
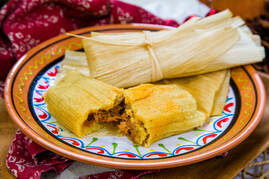 Pork Tamales
January: Recipe of the Month
By Max Coey
This month, the cuisine that will be featured is Latian food. When some think of Latian, they usually think of Mexico. However, Latian America encompases all of Centrel America, South America, and some of the Caribbean, and each country has their own cuisine that all contribute to Latian food in general, which revolves around a very important ingredient; Corn. Corn is used in everything from tacos, tortillas, tamales, enchiladas, and chimichangas. Other important ingredients are rice, stewed meats, and beans. Throughout Latian America you will see many dishes that incorporate those three items with tortillas, which are typically made of corn. As far as street food goes, sausages are widely popular as they are commonly used as a barbecue item throughout South America. As previously mentioned, corn is an important ingredient, and this month’s recipe for tamales features corn, as they are filling wrapped in corn husk. Recipe from allrecipes.com.
Ingredients for 8 ounces of dried corn husks:
- 1 large onion, halved
- 1 clove garlic
- 4 dried California chile pods
- 2 cups water
- 1 1/2 teaspoons salt
- 2 cups masa harina
- 1 (10.5 ounce) can beef broth
- 1 teaspoon baking powder
- 1/2 teaspoon salt
- 2/3 cup lard
- 1 cup sour cream
- Place pork into a Dutch oven with onion and garlic, and add water to cover. Bring to a boil, then reduce heat to low and simmer until the meat is cooked through, about 2 hours.
- Use rubber gloves to remove stems and seeds from the chile pods. Place chiles in a saucepan with 2 cups of water. Simmer, uncovered, for 20 minutes, then remove from heat to cool. Transfer the chiles and water to a blender and blend until smooth. Strain the mixture, stir in salt, and set aside. Shred the cooked meat and mix in one cup of the chile sauce.
- Soak the corn husks in a bowl of warm water. In a large bowl, beat the lard with a tablespoon of the broth until fluffy. Combine the masa harina, baking powder and salt; stir into the lard mixture, adding more broth as necessary to form a spongy dough.
- Spread the dough out over the corn husks to 1/4 to 1/2 inch thickness. Place one tablespoon of the meat filling into the center. Fold the sides of the husks in toward the center and place in a steamer. Steam for 1 hour.
- Remove tamales from husks and drizzle remaining chile sauce over. Top with sour cream. For a creamy sauce, mix sour cream into the chile sauce.
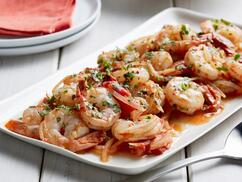 Shrimp Fra Diavolo
December: Recipe of the Month
By Max Coey
This month, I will be sharing some of my family’s Christmas traditions that involve FOOD! One of our biggest traditions is that we bake cookies to share with family & friends (our top secret chocolate chip recipe can be found on the back of any Nestle Toll House chocolate chips bag). For the actual dinner, many families do basically a repeat of Thanksgiving (having your turkey smoked tastes really good), and Christmas morning is always Pilsbury cinnamon buns. In Italian culture, Christmas Eve dinner is traditionally “a feast of 7 fishes” in which the meal features 7 different types of seafood. My family isn’t that extravagant, but incorporates shrimp into our meal, which will be this month’s recipe.
Shrimp Fra Diavolo Ingredients for 1 lb. linguine:
Directions:
By Max Coey
This month, I will be sharing some of my family’s Christmas traditions that involve FOOD! One of our biggest traditions is that we bake cookies to share with family & friends (our top secret chocolate chip recipe can be found on the back of any Nestle Toll House chocolate chips bag). For the actual dinner, many families do basically a repeat of Thanksgiving (having your turkey smoked tastes really good), and Christmas morning is always Pilsbury cinnamon buns. In Italian culture, Christmas Eve dinner is traditionally “a feast of 7 fishes” in which the meal features 7 different types of seafood. My family isn’t that extravagant, but incorporates shrimp into our meal, which will be this month’s recipe.
Shrimp Fra Diavolo Ingredients for 1 lb. linguine:
- 3 tbsp oil
- 1.5 lbs deveined shrimp, tails on
- 1 tbsp lemon juice
- Small, finely chopped onion
- 4 chopped garlic cloves
- 2 tbsp finely chopped thyme
- 1.5 tsp crushed red pepper flakes
- 2 tbsp butter
- A handful of chopped parsley
- A few torn basil leaves
- Salt
- Pepper
- 28 oz of crushed tomatoes + juice
Directions:
- Cook pasta according to package (al dente)
- Heat half of the oil in a large skillet until it is smoking
- Cook half of the shrimp until slightly brown but not completely cooked (1-2 mins), then repeat with the other half
- Add lemon juice to the shrimp, then set it aside
- Add the rest of the oil to the pan, and cook the onion, garlic, thyme, crushed red pepper, and salt & pepper for 3 minutes
- Add the butter to the pan
- Once the butter is melted, add tomatoes, parsley, and basil, and let simmer for 5 minutes
- Add the shrimp and let simmer for 7 more minutes
- Serve in bowls with pasta

Chocolate Waffles
By: Melanie Fisher 11/23/2020
What’s brown, soft, and sweet all over? Why, it’s chocolate waffles, of course!
Here are the ingredients you need:
Step 1: Preheat your waffle iron.
Step 2: Get a large mixing bowl. Then, put the following into the bowl: flour, baking powder, salt, sugar, cocoa powder.
Step 3: If you want to make hard sauce for your waffles, get a small bowl (not a very small bowl!) and mix in the following: softened butter, confectioners' sugar, vanilla extract, milk.
Step 4: Pour the waffle mix onto the waffle iron and let it cook until it’s a nice, golden brown.
Step 5: Serve the waffle hot with the hard sauce.
Step 6: Eat and enjoy!
By: Melanie Fisher 11/23/2020
What’s brown, soft, and sweet all over? Why, it’s chocolate waffles, of course!
Here are the ingredients you need:
- 1 1/12 cups of all-purpose flour
- 3 teaspoons of baking powder
- ½ teaspoon of salt
- ½ cup of (white) sugar
- 3 tablespoons of unsweetened cocoa powder
- 1 cup of milk
- 2 eggs
- 5 tablespoons of butter (4 melted, 1 softened)
- ¾ cup of confectioners' sugar
- ½ teaspoon of vanilla extract
- 1 teaspoon of milk
- a waffle iron
- 2 mixing bowls
Step 1: Preheat your waffle iron.
Step 2: Get a large mixing bowl. Then, put the following into the bowl: flour, baking powder, salt, sugar, cocoa powder.
Step 3: If you want to make hard sauce for your waffles, get a small bowl (not a very small bowl!) and mix in the following: softened butter, confectioners' sugar, vanilla extract, milk.
Step 4: Pour the waffle mix onto the waffle iron and let it cook until it’s a nice, golden brown.
Step 5: Serve the waffle hot with the hard sauce.
Step 6: Eat and enjoy!
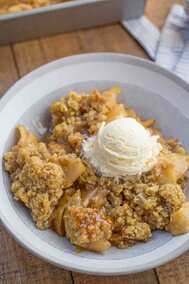
Apple Crisp
By: Melanie Fisher 11/15/2020
As Fall-themed desserts lose their charm at this time of year and Christmas food is the talk of the town, one question remains...
Do people think that Christmas cookies and a nice cup of hot chocolate is better than some apple crisp? Well, your guess is as good as mine, because I’m going to show you how to make some apple crisp!
Here are the ingredients you need to make this yummy dessert:
Here’s how to make apple crisp:
So, the first thing you have to do is to preheat your oven to 350 degrees. After that, peel the apples, core the apples, and cut the apples into bite-size chunks. You don’t want any of the seeds in there, so look out for any seeds that are still in your apples.
Next, place the apples in a 8x8 baking pan.
Have a medium-sized mixing bowl with you and combine the sugar, flour, and the teaspoon of cinnamon and mix it all up. And, about the butter...make sure to use a fork (or your hands, whichever works best for you) to cut it up until the pieces get as small as peas.
Sprinkle some of the mixture on top of the apples in the baking pan.
Then, bake for 45-60 minutes until the top is a nice golden brown and the apples are soft.
Let it cool for 10 minutes before serving. Then, all that’s left to do is to eat and enjoy!
*Bonus: You can also add ice cream or whipped cream on top of the apple crisp if you’d like!*
By: Melanie Fisher 11/15/2020
As Fall-themed desserts lose their charm at this time of year and Christmas food is the talk of the town, one question remains...
Do people think that Christmas cookies and a nice cup of hot chocolate is better than some apple crisp? Well, your guess is as good as mine, because I’m going to show you how to make some apple crisp!
Here are the ingredients you need to make this yummy dessert:
- 6 medium sized apples
- 1-1/2 teaspoon of cinnamon
- 1 cup of flour
- 1 cup of sugar
- 1 stick of room temperature unsalted butter
Here’s how to make apple crisp:
So, the first thing you have to do is to preheat your oven to 350 degrees. After that, peel the apples, core the apples, and cut the apples into bite-size chunks. You don’t want any of the seeds in there, so look out for any seeds that are still in your apples.
Next, place the apples in a 8x8 baking pan.
Have a medium-sized mixing bowl with you and combine the sugar, flour, and the teaspoon of cinnamon and mix it all up. And, about the butter...make sure to use a fork (or your hands, whichever works best for you) to cut it up until the pieces get as small as peas.
Sprinkle some of the mixture on top of the apples in the baking pan.
Then, bake for 45-60 minutes until the top is a nice golden brown and the apples are soft.
Let it cool for 10 minutes before serving. Then, all that’s left to do is to eat and enjoy!
*Bonus: You can also add ice cream or whipped cream on top of the apple crisp if you’d like!*
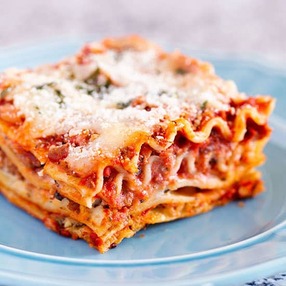 Lasagna
November: Recipe of the Month
By: Max Coey
Thanksgiving ends the month of November, so this month’s theme is obviously Thanksgiving food. There are 2 different approaches to thanksgiving: the elegant homemade meal, or the store bought product if it’s just too overwhelming. If you are going store bought, the best brands in my opinion is Stove Top turkey stuffing, Ocean Spray cranberry sauce, Jiffy cornbread, and Libby’s canned pumpkin (which still requires baking, but the pumpkin pie recipe is on the can). If you are going with a homemade approach, there are limitless side dishes you can make besides the basics. Veggie dishes are always great. In my family, we usually have sauteed green beans, and a sweet potato and apple dish. All this aside, there is no traditional Thanksgiving appetizer. My family comes from Italian heritage, so our appetizer is lasagna, which is this month’s recipe.
Ingredients for 1 pound no boil lasagna noodles:
- Mozzarella cheese
- Tomato sauce
- Sausage, meatballs, and pepperoni
- Cheese mixture
- 1 pound ricotta cheese
- 1 egg
- ½ cup grated romano cheese
- Salt
- Pepper
- Parsley leaves
- Preheat oven to 350 degrees
- Make cheese mix by simply mixing all ingredients
- Layer in a baking dish in the following order:
- Sauce
- Pasta
- Cheese mix
- Pasta
- Meat + sauce
- Pasta
- Cheese mix
- Pasta
- Sauce, pepperoni, & mozzarella
- Bake for 55-60 minutes, uncovering after 45
Rosemary Biscuits
by Esther Osobi
Are you hungry? Well get into your kitchen and let's make Rosemary Biscuits. This recipe is yummy and plus we have more time on our hands, so why not make this delicious dish?
**Don’t forget to preheat your oven to 425℉. Line the baking sheet with parchment paper or spray the baking sheet with non-stick cooking spray**
Now, get all your dry ingredients and mix them together. Slowly add your butter sticks and use two forks to smash the ingredients until they are a little textured to the touch.
Next up we add our half and half and mix until combined. The mixture is going to be very wet, but don’t worry. The next step is to scoop the dough onto a nicely floured surface. To do this you’ll need a well-greased 1/4 cup measuring cup in flour.
You’ll want to gently coat each side of the dough mounds, dust off any excess flour, then gently shape the dough into a ball. You’ll then place the balls of dough into a buttered 9″ pie plate. A 9″ cake pan will work fine, too.
Now for baking. These rosemary parmesan biscuits only take 22 minutes to bake, but they require two baking temperatures. You’ll start the biscuits off at 475 degrees and then turn it down to 400 degrees after 8 minutes. This allows the biscuits to rise and get crispy, without them getting too brown or burning.
Once you’re done baking, let the biscuits cool for 5 minutes before eating.
Hope you enjoyed it! See you next time!
by Esther Osobi
Are you hungry? Well get into your kitchen and let's make Rosemary Biscuits. This recipe is yummy and plus we have more time on our hands, so why not make this delicious dish?
- 2 cups all-purpose flour
- 1 tablespoon baking powder
- ¾ teaspoon salt
- ½ teaspoon garlic powder
- ½ cup grated parmesan cheese
- ½ teaspoon black pepper or any pepper
- 1 ⅓ cup Half and Half
- ¼ cup Fresh Rosemary (finely chopped)
- 5 tablespoons unsalted butter (cut into pieces and cold)
- 2 tablespoons granulated sugar
**Don’t forget to preheat your oven to 425℉. Line the baking sheet with parchment paper or spray the baking sheet with non-stick cooking spray**
Now, get all your dry ingredients and mix them together. Slowly add your butter sticks and use two forks to smash the ingredients until they are a little textured to the touch.
Next up we add our half and half and mix until combined. The mixture is going to be very wet, but don’t worry. The next step is to scoop the dough onto a nicely floured surface. To do this you’ll need a well-greased 1/4 cup measuring cup in flour.
You’ll want to gently coat each side of the dough mounds, dust off any excess flour, then gently shape the dough into a ball. You’ll then place the balls of dough into a buttered 9″ pie plate. A 9″ cake pan will work fine, too.
Now for baking. These rosemary parmesan biscuits only take 22 minutes to bake, but they require two baking temperatures. You’ll start the biscuits off at 475 degrees and then turn it down to 400 degrees after 8 minutes. This allows the biscuits to rise and get crispy, without them getting too brown or burning.
Once you’re done baking, let the biscuits cool for 5 minutes before eating.
Hope you enjoyed it! See you next time!
Apple Cider Donuts
By Alanya Friedman
It’s October you guys, which means it’s time for some tasty fall treats! And apple cider donuts are the best way to go. They’re perfect for pumpkin/apple picking, fun fall parties, or when you’re at home and craving a sweet snack. And luckily, you don’t have to depend on apple picking to get a taste of these donuts. With this quick and easy recipe you can make these donuts all year round!
INGREDIENTS:
3 c. apple cider
2 1/2 c. all-purpose flour
1/3 c. packed brown sugar
2 tsp. baking powder
1 tsp. kosher salt
1/2 tsp. baking soda
1/2 tsp. ground cinnamon
4 tbsp. Melted butter and cooled
1 large egg
Canola or vegetable oil, for frying
1/2 c. cinnamon sugar
Directions:
- 1. In a medium saucepan over medium-high heat, boil apple cider. Boil cider until lessened to ¾ cup. Pour that into a large heatproof bowl and let cool to room temperature.
- 2. In a large bowl, whisk together flour, brown sugar, baking soda, baking powder, salt, cinnamon. Whisk butter and an egg into cold apple cider. Add dry ingredients to the bowl and stir until fully combined.
- 3. Cover the bowl with plastic and refrigerate until the dough is cold and firm, for about 2 hours.
- 4. Then roll chilled dough into a ½ inch thick rectangle on a floured surface. Using a doughnut cutter, punch out doughnuts. (You can use the scraps as extra dough). Place doughnuts and holes onto baking sheets, and cover it with a dish towel.
- 5. Place cinnamon sugar in a bowl. Heat ½" oil in a large stockpot or Dutch oven, medium-high heat until it reaches 350°.
- 6. Add donuts to Dutch oven in batches, and cook evenly, until golden and crispy. 1 to 2 minutes per side, and can adjust the heat as necessary to maintain frying temperature between 350° and 375°.
- 7. Transport to a paper towel-lined plate for 30 seconds, then coat the warm donuts in the cinnamon sugar mixture.
Now you’re done! You can finally sit down and enjoy these delicious donuts.
October: Recipe of the Month
By: Max Coey
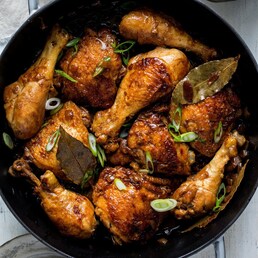
October is Filipino American History Month, so it seems only fitting that this month, I cover the basics of Filipino cooking and cuisine. Filipino cuisine is similar to other Asian cuisines like Chinese, Japanese, Thai, and Korean. Especially the importance of rice, which is a staple in Filipino cooking. However, after being controlled by the Spanish and the Americans for long periods of time, the cuisine has picked up traits from those outside influences. Like in many American dishes, the meat or fish is the main piece and is usually served as a whole filet, breast, chop, etc. Also popular are many soups, stews, and salad type dishes. One very common ingredient that you will find in many soups are animal bloods. Vinegar is also widely used and is a key ingredient in this month’s recipe: Filipino Adobo. Adobo is a basic marinade often used for meat, fish, and vegetables. It can be considered one of the most classic Filipino dishes. This recipe is variated off of one found on Food Network.
Ingredients needed for 1 lb. meat:
4 tablespoons vinegar
4 tablespoons soy sauce
2 crushed garlic cloves
3 peppercorns
Rice (for serving)
Directions:
Combine all ingredients and marinate for 3 hours
Bring Adobo to a boil
Let simmer covered for 30 mins, with occasional stirring
Uncover, let simmer for 20 more mins
Serve over prepared rice
By: Max Coey
October is Filipino American History Month, so it seems only fitting that this month, I cover the basics of Filipino cooking and cuisine. Filipino cuisine is similar to other Asian cuisines like Chinese, Japanese, Thai, and Korean. Especially the importance of rice, which is a staple in Filipino cooking. However, after being controlled by the Spanish and the Americans for long periods of time, the cuisine has picked up traits from those outside influences. Like in many American dishes, the meat or fish is the main piece and is usually served as a whole filet, breast, chop, etc. Also popular are many soups, stews, and salad type dishes. One very common ingredient that you will find in many soups are animal bloods. Vinegar is also widely used and is a key ingredient in this month’s recipe: Filipino Adobo. Adobo is a basic marinade often used for meat, fish, and vegetables. It can be considered one of the most classic Filipino dishes. This recipe is variated off of one found on Food Network.
Ingredients needed for 1 lb. meat:
4 tablespoons vinegar
4 tablespoons soy sauce
2 crushed garlic cloves
3 peppercorns
Rice (for serving)
Directions:
Combine all ingredients and marinate for 3 hours
Bring Adobo to a boil
Let simmer covered for 30 mins, with occasional stirring
Uncover, let simmer for 20 more mins
Serve over prepared rice
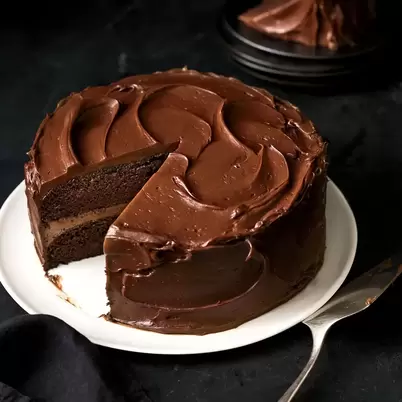
Sinfully Delicious Chocolate Cake
By: Justin Connell
Have you ever looked at a delicious triple layered chocolate cake with a coffee mousse and thought, “nah, they thing has so much sugar” but then ended up eating half the cake anyway? Well this chocolate cake will have that same effect but with less sugar.
Get out:
Directions:
Feel free to top with anything from buttercream icing to regular whipped cream!
By: Justin Connell
Have you ever looked at a delicious triple layered chocolate cake with a coffee mousse and thought, “nah, they thing has so much sugar” but then ended up eating half the cake anyway? Well this chocolate cake will have that same effect but with less sugar.
Get out:
- 2 cups of sugar
- 1 ¾ cup of flour
- ¾ cup of unsweetened cocoa powder
- 1 ½ teaspoon of baking powder
- 1 ½ teaspoon of baking soda
- 1 teaspoon of salt
- 2 eggs
- 1 cup milk
- ½ vegetable oil
- 2 teaspoons of vanilla extract
- 1 cup of boiling water (yes it has to be boiling)
Directions:
- Preheat the oven to 350 degrees F and grease two 9 in. round pans then line the bottoms with parchment paper.
- Stir together sugar, flour, cocoa, baking powder, baking soda and salt. Add eggs, milk, oil and vanilla, once fully mixed add in the boiling water.
- Then pour evenly into the 2 pans and then bake for 30-35 minutes, or until a wooden toothpick comes out clean. Let cool and then remove from pans.
Feel free to top with anything from buttercream icing to regular whipped cream!

Quarantine Snack Time
By: Justin Connell
Now that schools are closed for the rest of the year, we have more time to kill, so the first idea that pops into my head when I’m bored is binge watching Netflix baking shows! I watch the lot of them, like “Nailed It!” with Nicole Byers and Jacques Torres, and “Zumbo’s Just Desserts” with Adriano Zumbo. Which brings me to the topic of this article, easy quarantine snacks and desserts that have blown my mind and will blow yours as well. (P.S. I highly recommend both shows.)
The first recipe I tried when school was shut down was lemon squares. These were by far my favorite because they had the perfect amount of tang and sweetness while also adding a subtle yet noticeable lemon flavour.
For the crust you will need:
For the filling you need:
Now, dust with some powdered sugar and serve when cool! These are good for anytime, you can eat them for dessert or just as a quick snack before going on a walk.
By: Justin Connell
Now that schools are closed for the rest of the year, we have more time to kill, so the first idea that pops into my head when I’m bored is binge watching Netflix baking shows! I watch the lot of them, like “Nailed It!” with Nicole Byers and Jacques Torres, and “Zumbo’s Just Desserts” with Adriano Zumbo. Which brings me to the topic of this article, easy quarantine snacks and desserts that have blown my mind and will blow yours as well. (P.S. I highly recommend both shows.)
The first recipe I tried when school was shut down was lemon squares. These were by far my favorite because they had the perfect amount of tang and sweetness while also adding a subtle yet noticeable lemon flavour.
For the crust you will need:
- 2 sticks of butter
- 2 cups of all purpose flour
- ½ a cup of sugar
For the filling you need:
- 4 eggs
- 1 ½ cups of sugar
- ¼ cup all purpose flour
- 2 lemon juiced
- 1 zested lemon (you zest the lemon before you juice it)
- Preheat oven to 350 degrees (175 celsius)
- Then mix together the 2 sticks of butter, 2 cups of flour and ½ sugar until fully mixed and then press it into an ungreased 9/13 inch pan.
- Bake for 15-20 minutes or until the crust gets golden brown
- Next mix the remaining 1 ½ cup sugar and ¼ cup of flour, once fully incorporated add in the 4 eggs, lemon juice and lemon zest
- Bake for another 20 minutes, the bars will stiffen while they cool.
Now, dust with some powdered sugar and serve when cool! These are good for anytime, you can eat them for dessert or just as a quick snack before going on a walk.
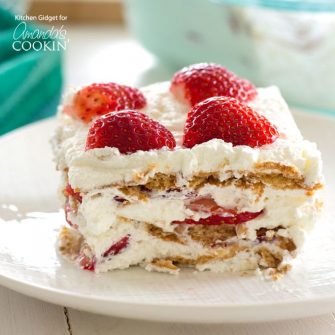
3-Ingredient Strawberry Icebox Cake
By Alanya Friedman
Every once in a while, we all need a taste of sweet sugary goodness. And who knew it could be so easy! This dessert recipe is both delicious, and very easy to make. And it will definitely have you wanting more. All you need are these three simple ingredients:
Directions:
By Alanya Friedman
Every once in a while, we all need a taste of sweet sugary goodness. And who knew it could be so easy! This dessert recipe is both delicious, and very easy to make. And it will definitely have you wanting more. All you need are these three simple ingredients:
- 5 cups sweetened whipped cream
- 11 large rectangular graham crackers
- 3 cups strawberry, chopped
Directions:
- Spread a thin layer of whipped cream in a square glass baking dish.
- Layer graham crackers on top, then cover with a layer of whipped cream.
- Sprinkle ⅓ of the strawberries on top, then layer with cream again.
- Repeat steps 2 and 3 until no more ingredients remain. (The top layer should be strawberries and should not be covered with cream.)
- Refrigerate for at least 3 hours.
 Irish Potatoes
March: Recipe of the Month
By: Max Coey 3/11/2020
St. Patrick’s Day is right around the corner, and many people celebrate with an abundance of green treats. Although they aren’t green, this month I will be sharing one of my family’s St. Patty’s Day staples: Irish Potatoes. Despite the name, they are not Irish, nor do they incorporate potatoes in any way. They are a very sweet St. Patrick’s Day dessert originating from Philadelphia, PA made out of cream cheese and coconut.
Ingredients for 60 “potatoes”:
Directions
By: Max Coey 3/11/2020
St. Patrick’s Day is right around the corner, and many people celebrate with an abundance of green treats. Although they aren’t green, this month I will be sharing one of my family’s St. Patty’s Day staples: Irish Potatoes. Despite the name, they are not Irish, nor do they incorporate potatoes in any way. They are a very sweet St. Patrick’s Day dessert originating from Philadelphia, PA made out of cream cheese and coconut.
Ingredients for 60 “potatoes”:
- ¼ cup softened butter
- 1 package (8 oz) of cream cheese
- 1 tsp vanilla
- 4 cups sugar (confectioner’s)
- 2 ½ cups of coconut flakes
- 1 tbsp ground cinnamon
Directions
- Beat butter and cream cheese (until smooth)
- Add vanilla and sugar, and beat (until smooth)
- Mix in coconut
- Roll into balls (no larger than a golf ball)
- Roll in cinnamon
- Chill on a cookie sheet
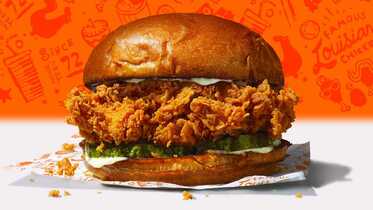 Popeyes' Chicken Sandwich (...according to commercials)
Popeyes' Chicken Sandwich
By Holden Foley
People across the globe waited for months for the release of the new Popeyes chicken sandwich. The talk about the sandwich was positive, with people claiming it was the best chicken sandwich compared to other fast food restaurants.
Popeyes had been originally opened on July 12, 1972 as the ‘Chicken on the Run’, to compete with Kentucky Fried Chicken. It quickly failed, but was reopened four days later as Popeyes Mighty Good Chicken. The chicken sandwich was immediately on the menu. Popeyes chicken sandwich was supposed to be a seasonal sandwich, releasing in the fall every year, and closing for the winter.
The 2019 sandwich release occurred on August 12th. From what I had heard when it first came out, the sandwich was supposed to be amazing. However, according to a seventh grader at MMS, “The bread is seasoned correctly, but none of the seasoning ever goes into the chicken. With the chicken, it’s really wet. You expect that burst of flavor when you bite into it, but it’s just bland.”
I had a similar experience when trying the spicy version of the chicken sandwich. I was expecting flavorful chicken and a soft bun. However, the chicken was dry and the bun didn’t taste different from any other sandwich. Neither the flavor nor the spiciness were strong. Overall, the sandwich did not stand out.
Still, the sandwich is well liked by many people. To fully understand what the Popeyes Chicken Sandwich is like, I would recommend trying it yourself.
 White Chocolate Rasberry Thins (Goodhousekeeping)
White Chocolate Rasberry Thins
By Alanya Freidman 12/17/19
The holidays are right around the corner and it’s time to celebrate with some tasty treats like this one. These white chocolate raspberry thins will have your taste buds begging for more and are perfect for every occasion. All you need are these simple ingredients:
By Alanya Freidman 12/17/19
The holidays are right around the corner and it’s time to celebrate with some tasty treats like this one. These white chocolate raspberry thins will have your taste buds begging for more and are perfect for every occasion. All you need are these simple ingredients:
- 2 ½ c. freeze dried raspberries
- 2 ½ c. of all-purpose flour
- ½ c. baking powder
- ¼ c. Kosher salt
- 2 sticks of unsalted butter (room temp)
- ¾ cup sugar
- 1 egg
- 1 ½ c. vanilla extract
- Melted white chocolate
- In a food processor, grind freeze-dried raspberries (you should have scant 1/2 cup).
- In large bowl, whisk together baking powder, flour, salt, and raspberry powder, and in another large bowl, use an electric mixer to beat butter and sugar until light and fluffy, for about 3 minutes. Beat in egg and vanilla.
- Reduce mixer speed to low and gradually add flour mixture, mixing just until absorbed.
- Shape dough into two 2-inch-square logs. Wrap and freeze for 20 minutes.
- Heat oven to 350°F. Line a baking sheet with parchment paper. Slice into 1/8-inch-thick squares. Place on prepared sheets.
- Bake, rotating positions of baking sheets halfway through, until the thins/cookies are light golden brown around edges, 10 to 12 minutes. Let cool on sheets 5 min. before transferring to wire racks to cool completely.
- Drizzle with melted white chocolate and sprinkle with crushed freeze-dried raspberries.
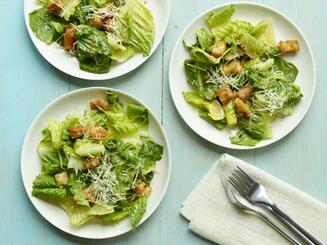 Classic Ceasar Salad
Leafy Green Side Dish Takes Top Rank on Food Chart!
By: Megan Quraishi
It has been evidently stated that salad really is one of the most eaten foods in the world! That might prove as surprising to some. To think that an overlooked side dish that people serve at a restaurant could inevitably be the main ingredient in a person's daily meals. But when you think deeper, it actually makes sense. Just think about it: Salad is very efficient and easy to make. You don't need to go to a restaurant because it can be homemade. It doesn’t cost very much, and it is a great meal option to those who are vegetarian or vegan. There are also so many different salads in the world to give a great variety. From caesar salad to house salad to cobb salad, fruit salad, pasta salad, greek salad, chef salad, even coleslaw! Plus many more that you wouldn’t even be able to list! These are all contributing reasons to why it is so popularly eaten.
A key point to bring up as to why salad is so popular is because it is healthy. Salads usually consist of vegetables and fruit. Sometimes even nuts. They can also have lots of protein in them, such as cheese, bacon, chicken, etc. If you have prior knowledge about healthy foods, then you might know that spinach and lettuce is listed among the healthiest foods all over the world! This is because it supplies a lot of vitamins like vitamin A and vitamin K at a low calorie rate. These ingredients are all mixed into one dish that is light yet nutritious.
The wide range of different salads also plays an important role in the popularity of them. Variety comes from different cultures with different preferences. One culture might not have the same interests or preferences as that of the American culture. Many cultures express themselves in food, that can be shown on an international scale through different, original, and inventive salads.
For example, Canada and the United states border each other. They are so close and yet so unique. People's daily foods change just by crossing a measly border. With it comes a whole new food group. For instance, it has been stated through research that any salad topped with chicken has reserved spots in Canadian restaurant menus. Yet it has also been proven that in America, it is hard to look at a restaurant menu and not see a salad covered with cheese. Already some different salads outweigh each other even when the two countries neighbor. Each salad on the long list of options has a place in at least one culture, or all cultures, (considering the world is becoming more united every day.)
The variety, efficiency, and nutrition are all wrapped up into one enjoyable meal!

Super Bowl: Second Highest Food Consumption Day of the Year
By Molly Hurley
Are you a SUPER Super Bowl fan? If you are, here’s something you should know: This Sunday, February 3, 2019 an estimated 180 million Americans will tune into to watch Super Bowl LIII. And, they will be apart of one of the countries biggest food consumption days!
Obviously, Thanksgiving is ranked first on the list of the country’s biggest food consumption days. But, Super Bowl Sunday is ranked second.
Last year, enough tortilla chips were purchased to stretch across the United States 2.5 times! And, in the past years, Americans have consumed 1.2 million bags of potato chips, 8.2 million bags of tortilla chips (79 million avocados), 3.8 million pounds of popcorn, and 3 million pounds of nuts: BEFORE the game even starts!
Well, we hope you have a great Super Bowl Sunday and not a Super Sick Monday!
For more information, check out: https://www.dogonews.com/2019/1/28/super-bowl-sunday-food-consumption-is-second-only-to-thanksgiving

Leftover Pumpkins? Eat Them!
By Molly Hurley
Now that Halloween and Thanksgiving are over many will be throwing their spooky jack-o-lanterns and decorative pumpkins out. Because of this there are millions of pumpkins stacked in landfills all over the world each November. But, do you realize how much food waste this generates?
Both a pumpkin’s seeds and its flesh are edible! 42% of the people in the UK buy pumpkins each year. 25% of these people throw their pumpkins away as food waste. 19% add their pumpkins to a compost heap. 20% put their pumpkins in a food waste collection. Only 30% cook the pumpkins they carved. Over 18,000 pumpkins are thrown away each year. That’s the equivalent of 360 million slices of pumpkin pie!
Did you know?: Not only do pumpkins generate food waste when their thrown out but, they also release a lot of methane and carbon dioxide when they rot. Both of these gases are very harmful to the environment.
Some popular ways to eat a pumpkin are by making pumpkin soup, pie, oatmeal, or a smoothie. But, how does one eat a pumpkin? Well, there are certain parts you won’t be able to eat, like the stalk. You can put this in a compost bin. Similar to a gem squash, the skin of a pumpkin is edible in small varieties. Some pumpkins have tough skins that are hard to eat while others can be a lot easier to eat. The flesh of a pumpkin is good in pies and breads. For bigger pumpkins the flesh can be better in soups and curries. The “gross and slimy” guts of a pumpkin are useful too! They are delicious as a base for broth and mulled wine. The seeds of a pumpkin are really good when they’re roasted!
Though it’s surprising, pumpkins can and should be eaten after Halloween is over. They are delicious in soups, pies, bread, and the seeds are good roasted! When you don’t eat your pumpkins you’re contributing to food waste. Not eating pumpkins also contributes to global warming because when pumpkins begin to rot they release greenhouse gases. So, try something new this year! Eat your jack-o-lantern!

Students’ Favorite Restaurants In Maplewood Village
By Max Richman
Maplewood Village is a place that some people love, some people tolerate, and some people don’t like. Where the small businesses flourish and the weird businesses thrive. Where it seems the whole town is in on Friday afternoon. The place which is home to brilliant stores and restaurants we all enjoy. Through the power of the good old survey and Mr. Odell’s willingness to survey all of his classes, we bring you the most unbiased look at the students’ choice for Maplewood Village restaurants.
The Results:
It was a close race with the winners, Bagel Chateau and Village Trattoria, having a 2.7% lead over the second place, Arturo’s, and a 19.3% lead over the last place, Belmont Burger. This seems surprising because Bagel Chateau isn’t as professional as places like Arturo’s and CODA. This does make sense however when you realize that most kids only eat at those places on special occasions. Since they go to places like Village Trattoria and Bagel Chateau more often, it would be fresher in their minds when they vote and they might vote them above the fancier restaurants.
Conclusion
In conclusion, all restaurants are great in their own right. If you are new to Maplewood, you should go there yourself and make your own opinion. Whatever you think is the best one, there’s no denying that this is what the majority likes.

Foreign Food Shout-out
By Max Richman and Justin Strugger
The world is a crazy place. There are so many cultures and they all have different things that they eat on a daily basis. So, we will be highlighting them every week. Today’s topic is desserts and breakfasts.
Deserts
Food #1: Brigadeiro (Brazil)
Our first Food is Brigadeiro. This is a small Brazilian candy made from condensed milk and some kind of flavoring. They are usually chocolate but can be strawberry, coconut, and even churro flavored!
Food #2: Po’e (Tahiti)
Secondly we have Po’e (Pronounced Po-way) which is a Tahitian pudding-like dessert which has fresh fruit like mangoes, bananas, or papayas. It’s traditionally served at Tahitian barbecues.
Food #3: Suspiro de Limeña (Peru)
Lastly we have Suspiro de Limeña a Peruvian cake based on dulche de leche. It’s sort of a regular cake with some almond and meringue. Weirdly the name translates to “Sigh of Lima Lady”, Lima being where this cake originated.
Breakfasts
Food #1: Kahvalti (Turkey)
Kahvalti is a popular Turkish that contains many light olives paired deep cheeses, honey with fruit preserves, butter and crisp bread. This is often accompanied with delicious black tea or alongside popular Turkish coffees. Breakfast is considered one of the most significant cultural foods in Turkey.
Food #2 - Arepas (Venezuela)
Arepas is a fun Venezuelan food full of flavorful meats, beans, rich avocados, and well-made eggs. The tangy meal is known to be filling and one of the most famous breakfast foods in the world. It also helps form strong Venezuela Children with healthy diets.
Food #3 - Laks og eggøre (Norway)
Laks og eggerøre is a delightful Norwegian morning feast incorporates juicy smoked salmon and fluffy scrambled eggs. This refreshment is especially good beside a sandwich, anchovies, or a variety of tasty dressings. Norwegian food is commonly presented with a very fresh zing and wholesome ingredients.
Recipes
Pop-pop’s Pappardelle
How To Make Homemade Pasta: A Recipe from my Grandfather
by Ella Cervi
As a child, my Pop-pop (Italian grandfather) grew up eating homemade pasta almost every day. My great-grandmother was from Italy, and she lived to cook. My mom remembers going over to her grandmother’s house and just seeing pasta drying everywhere, over the living room furniture, on beds, on tables, just everywhere. My great-grandfather had a wine cellar in the basement of their house, and everything they ate was homemade. When my grandfather and mother were younger, my great-grandmother would always cook with them, and now my grandfather and my mother cook with me. I love to make pasta with my Pop-pop, and there is nothing better than enjoying homemade pasta with your family.
Here is the Recipe for my Grandfather’s Traditional Italian Pasta:
Ingredients -
4 eggs
3 cups of flour
A little bit of water (optional)
Things you will need -
A pasta maker
A clean surface (my Pop-pop uses a large cutting board for his work area)
A fork
A drying rack (or a place to dry the pasta such a table)
A pasta scraper
A container
Instructions -
1) Pour the flour onto the clean surface, and make a largish hole/well in the middle of the flour.
2) Break the eggs into the center of the well in the flour.
3) Using a fork scramble the eggs.
4) Slowly, mix the flour into the egg mixture using your hands. Work from the inside out, and only add a little bit of flour at a time.
5) When half of the flour is mixed in with the eggs use the pasta scraper to mix in the rest of the flour.
6) Knead the dough mixture for 4-5 minutes, or until the dough is soft and pliable.
7) Cover the dough (preferably with a container, do not use plastic wrap) and let it rest covered for 30 minutes.
8) Cut the dough ball into quarters, take one and leave the other three out and to the side.
9) Flatten the dough with the palms of your hands.
10) Put the pasta maker on the lowest setting (just the flat opening not the one that cuts the pasta) and send the dough through the pasta maker.
11) Fold in half and send it through again, then repeat this process two more times.
12) After the dough has gone through 3 times do not fold it anymore and move up to the next setting.
13) Send it through the machine, every time moving up the setting. When you think the dough is flat enough set it on the drying rack or table.
14) Take the next quarter of dough and repeat the process.
15) When you are done with the second piece of dough set that down and then pick up the first piece of dough that was sitting there.
16) Take the first piece of flattened dough and send it through the pasta maker, the section with the cut that you want. You can make angel hair, fettuccine, pappardelle, whatever you want. After the pasta is cut set it out on the table.
17) Continue to flatten and cut the rest of the dough.
18) Once all the dough is cut, spread it out on the drying rack or table over towels.
19) Let the pasta dry (when I made it with my grandparents we let it dry overnight).
20) When the pasta is ready, boil it with some salt and add whatever sauce or toppings you like.
21) Enjoy your homemade pasta! Homemade pasta is definitely better than storebought!
Note: If you are looking for some good, traditional recipes for homemade tomato sauce, allrecipes.com has some good options.
5 Thanksgiving Twist for you to Enjoy!
By Justin Strugger
Yeah, I know! Thanksgiving is coming up so soon. Isn’t it awesome? Everyone loves to fill their stomachs with family and friends. If you want to be different this year here are five ways to put a spin on classic thanksgiving foods.
To do this you need: Hershey Kisses, NutterButter's, and bag of Miniature chocolate chips. Simply put half of the chocolate chips in the microwave for 5 second intervals and mix thoroughly every time. Then, Dip the flat end of the Hershey Kiss in the melted chocolate and stick it to the NutterButter. And lastly, stick the flat end of the mini chocolate chip into the melted chocolate and stick in onto the other end of the NutterButter. That’s how to make acorn pops.
3. Put a little twist on a normal thanksgiving with Rosemary-Port Cranberry Sauce. You can get all the info on how to make it here ↓
http://www.countryliving.com/food-drinks/recipes/a5912/rosemary-cranberry-sauce-recipe-clx1114/
4. If you really want to take this to the next level, try making Crispy Garlic Butter Parmesan Smashed Potatoes
This recipe is from cafedelites.com
You will need...
This recipe is from oliviacusine.com.
You will need…
So there it is! Here are top 5 Thanksgiving Treats you can make this Holiday Season. So let’s have a review! You can make, a Fruit Turkey, Acorn Pops, Rosemary-Port Cranberry Sauce, Crispy Garlic Butter Parmesan Smashed Potatoes, and Rosemary and Garlic Roast Beef. Have fun, and keep on cooking!
By Justin Strugger
Yeah, I know! Thanksgiving is coming up so soon. Isn’t it awesome? Everyone loves to fill their stomachs with family and friends. If you want to be different this year here are five ways to put a spin on classic thanksgiving foods.
- Have a vegetarian in the house, who won’t eat turkey? Well this is the year of change. Make a Fruit Turkey with skewers and well, fruit. Start with a base such as a melon, or cantaloupe and and add skewers (as feathers) that can have whatever you want. Make you're own feet, and put on a face.
- Make little Acorn Pops!
To do this you need: Hershey Kisses, NutterButter's, and bag of Miniature chocolate chips. Simply put half of the chocolate chips in the microwave for 5 second intervals and mix thoroughly every time. Then, Dip the flat end of the Hershey Kiss in the melted chocolate and stick it to the NutterButter. And lastly, stick the flat end of the mini chocolate chip into the melted chocolate and stick in onto the other end of the NutterButter. That’s how to make acorn pops.
3. Put a little twist on a normal thanksgiving with Rosemary-Port Cranberry Sauce. You can get all the info on how to make it here ↓
http://www.countryliving.com/food-drinks/recipes/a5912/rosemary-cranberry-sauce-recipe-clx1114/
4. If you really want to take this to the next level, try making Crispy Garlic Butter Parmesan Smashed Potatoes
This recipe is from cafedelites.com
You will need...
- 2 lbs | 1kg potatoes Yukon Gold or Carisma
- A light spray of olive oil
- 3 tablespoons melted butter
- 4 cloves garlic, crushed
- 1 tablespoon fresh chopped parsley
- Kosher Salt and Black Pepper to taste
- 2 tablespoons Parmesan Cheese
- Pre-heat your oven to broil (or grill) settings to medium-high heat (about 200°C | 400°F).
- Place potatoes in a large pot of salted water. Bring to the boil; cook, covered for 30-35 minutes or until just fork-tender. Drain well.
- Lightly grease a large baking sheet or tray with cooking oil spray. Arrange potatoes onto the sheet and use a potato masher to LIGHTLY flatten the potatoes in one piece (not too hard or they will end up mashed).
- Mix together the butter, garlic and parsley. Pour the mixture over each potato. Sprinkle with salt and pepper and lightly spray with olive oil spray.
- Broil (or grill) until they are golden and crispy (about 10-15 minutes). Remove from oven, sprinkle over the parmesan cheese and return to the oven until the cheese is melted.
- To serve, season with a little extra salt and parsley, and serve immediately.
This recipe is from oliviacusine.com.
You will need…
- 3lbs boneless Rib Eye roast
- ¼ cup chopped Fresh rosemary, or other favorite herbs
- ¼ cup chopped garlic (about 20 cloves)
- Salt and freshly ground pepper to taste
- 4 tablespoons olive oil, divided
- 4 tablespoons butter, divided
- 4 cups of a variety of Mushrooms, sliced to about the same size
- 1 cup of stock
- Preheat oven to 350F.
- Tie the roast and season generously with salt and pepper.
- Mix together rosemary and garlic. Add 2 tablespoons of olive oil and stir to combine. Reserve.
- In a cast iron skillet, over medium heat, heat 2 tablespoons of olive oil and, once smoking hot, sear all sides of the meat.
- Remove skillet from heat. Brush the herb-garlic mixture all over the roast.
- Bring the roast, in the cast iron skillet, to the preheated oven and cook for about 1 to 1.5 hours or until a meat thermometer reads 135F degrees (medium-rare). Let it rest for at least 10 minutes before serving (final temperature should be 145F for medium rare.)
- While the roast is resting, sauté the mushrooms over medium heat with 2 tablespoons butter until cooked through and no liquid is left in the pan, about 5 minutes. Season with salt and pepper.
- Remove roast from the cast iron skillet and bring the skillet to the stovetop. Add stock to the pan and deglaze the pan, scraping all the bits from the bottom. Allow to simmer until thick.
- Add the mushrooms to the sauce, stir in the remaining 2 tablespoons of butter and stir until the sauce is silky. Then, place the roast back in the cast iron with the sauce and spoon some of the sauce over the roast.
- Garnish serving platter with fresh rosemary if desired.
So there it is! Here are top 5 Thanksgiving Treats you can make this Holiday Season. So let’s have a review! You can make, a Fruit Turkey, Acorn Pops, Rosemary-Port Cranberry Sauce, Crispy Garlic Butter Parmesan Smashed Potatoes, and Rosemary and Garlic Roast Beef. Have fun, and keep on cooking!

Pumpkin Pie Oatmeal Cookies
by L.L.
The recipe below is something that I have worked to cultivate to my personal taste for many years. My original recipe for these cookies was taken from “How Cooking Works,” a simple cookbook with fast, easy recipes. As I baked, I experimented with the ingredients and processes. Here is my final recipe:
Cooking Time: 25 minutes Makes: 15 big cookies or 25 small ones
Ingredients:
½ cup butter, at room temperature
1 egg, at room temperature
1-3 tablespoons honey
1 cup all--purpose flour
½ cup uncooked oats
½ cup dark chocolate chips
¼ teaspoon pumpkin pie spice
1 teaspoon vanilla extract (optional)
Instructions (Some taken directly from cookbook):
- Preheat the oven to 350°F (180°C). Line two baking sheets with with parchment paper.
- In a bowl, use an electric mixer to beat the butter and egg together. Add the vanilla, if you decide to use it.
- Work in the flour and honey with a spoon until it forms a soft dough, then mix in the chocolate chips and the pumpkin pie spice. I personally prefer to do this part with my hands instead of a spoon.
- Roll the dough into 15 to 25 balls and place on the baking sheets, leaving space around each ball. Flatten the balls slightly and bake in the oven for 15 minutes, or until golden.
One Ingredient Ice Cream
By McGhee Steiner
Ice cream has been a popular dessert and tasty snack for many years. Here is a recipe that involves only one ingredient and is a quick, easy make.
Watch the video! - https://www.youtube.com/watch?v=0lZ3D8IlQmg
*Gluten free - Dairy free - Vegan - Free of added sugars - Paleo*
No longer must you fret about calories and nutrition content when you embrace the overwhelming power of rich, scrumptious banana ice cream. With this easy, healthful and simultaneously delicious recipe, you will become a slave to a not only gluten free, dairy free, completely natural and vegan, yet involving merely one ingredient ice cream!
What you need:
“Ingredient”:
- 3 ripe medium bananas
*Optional additions to enhance include:
- Almond milk
- Maple syrup
- Honey
- Xanthan gum (natural thickener)
- Vanilla extract
- Crushed mint leaves
- Strawberries
Kitchen Materials:
- Cutting board
- Knife (Preferably butter knife or plastic for safety)
- Food processor (a blender will also suffice)
Serves: 2-3
Steps
- Peel the bananas on the cutting board (freezer safe plates are also effective).
- Using the knife, carefully slice each into evenly sized pieces, about one inch wide “coins”.
- Organize the slices so that they are in contact as little as possible. You can leave them on your current surface.
- Freeze the bananas until firm. Preferably this is completed overnight (about eight hours) to ensure firmness.
- Puree the frozen slices in the food processor. *If you plan on adding optional additions to enhance flavor or texture, do so at this point. At first, your mixture should appear “crumbly”, yet continue to puree until the product is soft and creamy.
- Enjoy some of the healthiest, most delectable ice cream there ever was! You can garnish with chocolate shavings, fruit, or any special flavor you desire. Take a peek below to check out recipes for some tasty toppings.
This dessert is best right after it’s made, yet can be preserved in the freezer enclosed within a sealed, freezable container for a few weeks.
Toppings:
From Amy Densmore’s The Paleo Cupboard Cookbook: Real Food, Real Flavor
Salted Caramel Sauce -
Whipped Coconut Cream -
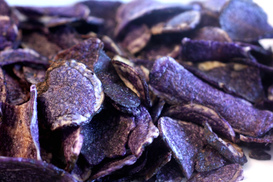
Blue potato chip recipe
By Devin Brown
Blue potatoes hail all the way from south america. Now believe it or not these potatoes have no food colorings at all they get there blue color from antioxidant in the potato. these potatoes are actually more healthy than regular white potatoes. So enjoy this homemade snack.
what you will need for this recipe is
2 blue potatoes
1 frying pan
vegetable oil
a large and small bowl
paper towels
cutting board
olive oil
salt
First take the potatoes and chop them into thin slices on the cutting board. Next put the frying pan on the stove and pour the vegetable oil into the pan and let it heat up on a high heat. Once the vegetable oil heats up ( you will know if you dab some water on and it sizzles) carefully put the potatoes in the oil and turn the heat down to a medium low temperature. once the potatoes rise to the top take a fork and flip them over. After you do that let the potatoes sit until they get crispy and brittle then take them out. Once you take them out take the small bowl and the paper towels and use the paper towels as a grease strainer and place it over the bowl and thet them sit for about a minute. after that take the large bowl and put the potatoes in. then take a dab of olive oil and the salt and mix it up. Serve however you like and enjoy.
Chef Devin.
Chocolate Explosions
By Ava Syed
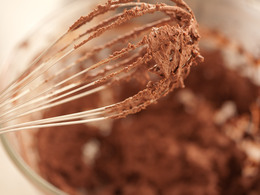
A new spin on chocolate mousse, you can use it for toppings, or just on its own (like we do at my household) A recipe developed by Jen Schwartz (my mom) Without further ado, the recipe.
Ingredients:
Mix together ricotta cheese, and vanilla extract. Next fold in the cocoa powder, and sprinkle in sugar as you fold into the cocoa powder. Give it one final stir, and enjoy “Chocolate Explosion”!
Ingredients:
- ½ cup ricotta cheese
- 1 teaspoon unsweetened cocoa powder
- 1 teaspoon vanilla extract
- ½ teaspoon brown, or white sugar
Mix together ricotta cheese, and vanilla extract. Next fold in the cocoa powder, and sprinkle in sugar as you fold into the cocoa powder. Give it one final stir, and enjoy “Chocolate Explosion”!
Custom Cuisine
Page by: Nathaniel Tabora
 Finished product of the Pizza
Todays Recipe: Margarita Pizza
Total Time: 1-1.5 hrs
Time Breakdown: Cooking: 1.00 hour(s)
Baking: 10-15 minutes
Prep: 15-20 minutes
Needed Ingredients :
Directions:
First, get a blender and a cutting board. You will need this later and soon. Open the tomatoes and pour about 16 oz into the blenders cup. Tightly seal the cap shut and then blend it until it has become a chunky puree. Now, go and take 2 cloves of the garlic and smash it with a knife until it has been crushed. Then heat up a saucepan with the 2 teaspoons of olive oil. Take the crushed cloves of garlic and put them in the pan on medium heat until they are golden brown or starting to have an aroma. You will now take the puree and pour it into the saucepan and add the salt, sugar, and about 4 leaves of basil. Turn the heat to a simmer. Do not cover. Stirring occasionally, let it simmer for 40 minutes. While it’s simmering, cut the mozzarella roughly chop it into square cubes. About 35 minutes into the simmer preheat your oven to 375 degrees. Get 1 pizza pan and place your crust on the pan. Get the sauce after 40 minutes and then place it on the pizza crust with about 1 inch to spare. Now place the cheese about 2 inches from the crusts. Add basil and thyme to your liking. Once the oven is preheated, place the pizza for 10-15 minutes in the oven. Once that’s done, you are finished.
Total Time: 1-1.5 hrs
Time Breakdown: Cooking: 1.00 hour(s)
Baking: 10-15 minutes
Prep: 15-20 minutes
Needed Ingredients :
- 1-2 12 inch Pizza Crusts (Flatbread Versions are suggested to make it authentic.)
- One 32 oz can of San Marzano Tomatoes
- One fresh ball of Mozzarella
- One little carton of fresh basil (You can find them at Stop and Shop)
- One little carton of Thyme
- ⅛ tsp Salt
- ¼ tsp Sugar
- 2 cloves of fresh garlic
- 2 teaspoons of Olive Oil
Directions:
First, get a blender and a cutting board. You will need this later and soon. Open the tomatoes and pour about 16 oz into the blenders cup. Tightly seal the cap shut and then blend it until it has become a chunky puree. Now, go and take 2 cloves of the garlic and smash it with a knife until it has been crushed. Then heat up a saucepan with the 2 teaspoons of olive oil. Take the crushed cloves of garlic and put them in the pan on medium heat until they are golden brown or starting to have an aroma. You will now take the puree and pour it into the saucepan and add the salt, sugar, and about 4 leaves of basil. Turn the heat to a simmer. Do not cover. Stirring occasionally, let it simmer for 40 minutes. While it’s simmering, cut the mozzarella roughly chop it into square cubes. About 35 minutes into the simmer preheat your oven to 375 degrees. Get 1 pizza pan and place your crust on the pan. Get the sauce after 40 minutes and then place it on the pizza crust with about 1 inch to spare. Now place the cheese about 2 inches from the crusts. Add basil and thyme to your liking. Once the oven is preheated, place the pizza for 10-15 minutes in the oven. Once that’s done, you are finished.
Reviews
The Outback Steakhouse
By Nathaniel Tabora
Now, if you had the rather poor chance to travel Route 22 chances are that you have seen the plaza that is across the JMK BMW lots. In there is a Outback Steakhouse. That my people is the subject of question today. Let us start off with the main exterior. There is not much to say here, it looks like a store front. But once we move into the front, we see that this is the true top of the line chain food place. The main desk is well sized and is lighted accordingly. The receptionist is very polite and kind. There was about a 2 minute wait after we had walked in. Another thing that I had noticed was that there was a little refreshment counter that was self serve. One seated I had seen that the Outback really takes the effort to remind you that you are in an Australian themed restaurant. Pictures have the soft lighting theme and they range from joey crossings and safaris that have been photographed. Wood was used throughout the whole building. The booth that we had been given was perfect for a family of 6 and that left us with plenty of room. (We had 5)
When our “free appetizer” came the presentation was near perfect. Arrived it was served on a wooden platter with spread for the bread appetizer. Now, we had ordered a flower onion dish and was nicely appointed and there was abundant flavor.The dish tasted different than the expected onion flavors. Now, after all this was done, I decided to order the Steak and Lobster dish that came with a soup. The soup came after a 15 minute wait and the actual meal came in 25 minutes. When the steak arrived the medium rare platter was cooked to a near perfect level, minus a few bites, and was a little chewy here and their. The lobster was not that big, and there wasn’t butter sauce. But there was good flavor and was easy to come off the shell.
Overall, by the time the night had ended, there was a total bill of $120. That means there was an average of $24.00 per head. Not bad for a family of five. MY verdict:
Average Score:
4.1
Food: 4.5 out of 5
Price: 4 out of 5
Service: 4 out of 5
Interior: 5 out of 5
Wait: 3 out of 5

Savoring Soursop
By Mcghee Steiner and Clea Licht
Soursop- a supposedly heavenly fruit. It is depicted and vividly described as a delightful combination of light but tangy pineapple, with a sweet infusion of creamy mango, laced with pale yellow ribbons of citrus and and accented with a lush and smooth hint of banana, all encased in the tough, lime green hyde of the leathery fruit. However, we, as highly experienced food critics with extravagantly refined taste buds, we would like to make further suggestions on the making of the juice of this delicious fruit, our own opinion on the taste of this widely rumored delicacy, and offer a wide variety of critiques and comments on the restuarant that we tasted this fine drink at.
When we first noted the presence of soursop on a menu, it certainly caught our attention. A name we had never once heard before, an apparently peculiar beverage that intrigued us. What was it? What would it taste like? How would it look? We were creating intricate images and ideas in our minds, frothing with abstract expectations, but it was time to find out the truth. Exotic, succulent, a spectrum of brilliant flavors and fruits splashed into one...Would this beverage be up to the test?
To begin, the taste we experienced when we took our first drink of this slightly lukewarm juice was- ‘Wow, the description of this fruit does not even begin to describe the taste adequately.’ You may, now, be under the false impression that we were surprised for the better- this point is highly arguable. Sadly, though, that was not the case. After our initial thoughts, we commented on how this juice tasted highly of ginger, and was hardly reminiscent of any of the other tastes described.
